Although my interest in doing things the old fashioned way may seem like planning for Armageddon, it has to do with my desire to understand how others live, or used to live. Laura Ingalls Wilder's series of books and my grandmother's steady supply of yarn, knitting needles, and stories of life before and after World War II played a huge role in forming my interest in things like churning my own butter and knitting socks. Of course it makes much more sense to go to the store and just buy both of these items, but when you make them by hand from raw materials, you feel that primal spark of human ingenuity and appreciate plain old butter and socks in a whole new way.
 Life in Niger is a harsh reminder of what the world was like before the advent of electricity. Frequent power cuts (often multiple times a day) render lights, freezers, air conditioners, fans, sewing machines, and any other electronic device useless. This can be horribly uncomfortable when the temperature reaches into the 120's and there is not a cloud in sight. It can also be terrible for business if you rely on electricity to create products for customers (just think of all the spoiled frozen meat or shirts that can't be made).
 While most meat in Niger is sold live or very recently butchered, thus avoiding the need for refrigeration, some meat is dried under the Nigerien sun to make the regionally distinctive jerky known as kilichi.

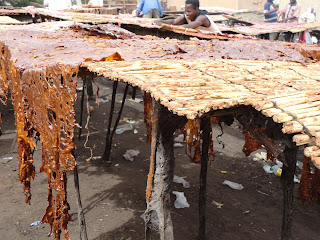
 This Nigerien specialty is made from the finest cuts of beef or mutton that have been cleaned of all vessels, fat, and bones. It is sliced into long, paper-thin strips about an arm-span in length. These strips are spread out on high tables made of straw screens to dry in the strong sunlight.

Then, it is returned to the drying racks and allowed to dry to a crisp, brittle consistency. The finest kilichi splinters very nicely into crackly bits.
 Although I have always wanted to try making my own beef jerky, especially after reading about Pa Ingalls making smoked venison in a hollowed out tree trunk, I am a little hesitant to experiment with it. So instead, I ferreted out the location of the best kilichi vendors in Niamey and paid them a visit (the production and sale of kilichi takes place in different areas of the city).
 Life in Niger is a harsh reminder of what the world was like before the advent of electricity. Frequent power cuts (often multiple times a day) render lights, freezers, air conditioners, fans, sewing machines, and any other electronic device useless. This can be horribly uncomfortable when the temperature reaches into the 120's and there is not a cloud in sight. It can also be terrible for business if you rely on electricity to create products for customers (just think of all the spoiled frozen meat or shirts that can't be made).
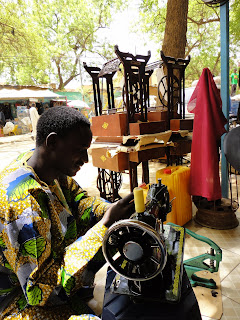
And so, my curiosity in all things "old-fashioned" (from my perspective) has increased since coming to Niger. When you walk through the tailors' section of the grand marché, you see men sitting outside their stalls making clothes to order on foot-powered sewing machines. Of course, they have rigged up a way to motorize their machines, but if the power goes off, it's easy for them to unstrap the tiny motor and start pedaling away.
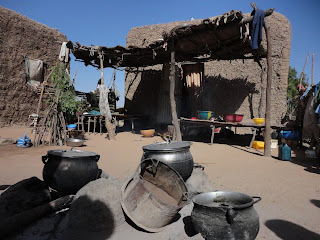
This need for electric independence reaches into the realm of food as well. If the electricity goes off, whatever you have in the fridge is going to spoil. Like many Americans, I don't think twice about ice-cold water or the food chilling in my refrigerator. Come to think of it, I don't even think twice about owning a refrigerator. However, for many Nigeriens, this basic American appliance is a luxury. Even if they do own a refrigerator, not everyone has a generator that kicks on when the national electric company fails. So what do you do when you have a freezer full of meat and you are instantaneously zapped back to life B.E. (Before Electricity)?
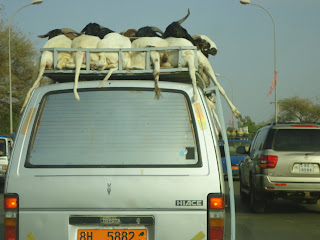
 While most meat in Niger is sold live or very recently butchered, thus avoiding the need for refrigeration, some meat is dried under the Nigerien sun to make the regionally distinctive jerky known as kilichi.
 This Nigerien specialty is made from the finest cuts of beef or mutton that have been cleaned of all vessels, fat, and bones. It is sliced into long, paper-thin strips about an arm-span in length. These strips are spread out on high tables made of straw screens to dry in the strong sunlight.
Before the meat has completely dried out and is still relatively supple, it is either salted or coated in a spice mixture with a peanut paste base.


Given Niger's hot, dry climate, it only makes sense to preserve food by drying it in the sun. This is one of the oldest methods of food preservation and is relatively simple and inexpensive (1). When you dry food, all of the moisture is removed, making it an inhospitable environment for bacterial growth, and the natural enzymes that lead to decomposition are slowed down enough to give the food a longer shelf-life (2). In a house with no refrigeration, this can be one of the best ways to keep stores of food for later.
 Although I have always wanted to try making my own beef jerky, especially after reading about Pa Ingalls making smoked venison in a hollowed out tree trunk, I am a little hesitant to experiment with it. So instead, I ferreted out the location of the best kilichi vendors in Niamey and paid them a visit (the production and sale of kilichi takes place in different areas of the city).
Their stalls are located on the median of a very busy road, but this does not deter them from swarming you when you pull up to the side. Before I could even get out of the car, several hands were shoving morsels of the thin strips of meat in my face. A Nigerien colleague assured me that this is totally normal. 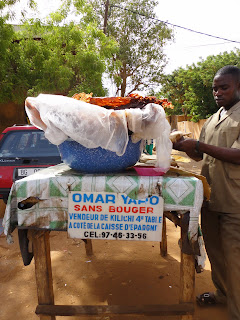 I sampled the crispy bits of meat until I identified a good one (the crispier the better) and began the process of haggling over the price. According to Le Sahel (a local newspaper), the small sheets cost between 1,000 to 5,000 CFA (roughly $2-10) while the larger ones range from 8,000 to 20,000 CFA ($16-40).
 I sampled the crispy bits of meat until I identified a good one (the crispier the better) and began the process of haggling over the price. According to Le Sahel (a local newspaper), the small sheets cost between 1,000 to 5,000 CFA (roughly $2-10) while the larger ones range from 8,000 to 20,000 CFA ($16-40).
While I may not have ignited that primal spark of human ingenuity by making my own beef jerky this time, the pervasive presence of animals on the street and meat processing in the markets of Niamey certainly bring me one step closer to communing with thousands of generations of inventive humans.
1) University of Illinois at Urbana-Champagne, College of Agriculture
2) Put 'em Up: A Comprehensive Home Preserving Guide for the Creative Cook, Sherri Brooks Vinton. p.71


